Are you wondering how to adjust the force settings on your garage door opener for a lightweight door? Well, you’re in the right place! In this guide, we’ll show you exactly how to tweak the force settings to ensure your lightweight garage door operates smoothly and safely.
Picture this: you’re trying to open or close your garage door, but it feels heavy and sluggish. That’s because the force settings on your door opener need to be adjusted to match the weight of your door. Don’t worry, it’s not as complicated as it sounds!
In this article, we’ll break down the process into simple steps, so you can easily adjust the force settings on your garage door opener and enjoy effortless operation. Let’s get started and make your garage door feel light as a feather!
- Locate the force adjustment knob on your garage door opener.
- Ensure that the garage door is closed.
- Turn the force adjustment knob clockwise to increase the force setting.
- Open the garage door and observe its movement.
- Continue adjusting the force until the door opens smoothly and reverses when it hits an obstacle.
Adjusting the force settings of your garage door opener is important for a lightweight door to ensure safe and efficient operation.
How to Adjust the Force Settings on a Garage Door Opener for a Lightweight Door
Garage doors come in different sizes and weights, and it’s important to adjust the force settings on your garage door opener to ensure smooth and safe operation. In this article, we will guide you through the process of adjusting the force settings specifically for a lightweight door. By following these steps, you can optimize the performance of your garage door opener and prevent any potential damage to your door. Let’s get started!
Understanding Garage Door Opener Force Settings
When it comes to adjusting the force settings on a garage door opener, it’s crucial to have a good understanding of what these settings actually do. The force settings control the amount of power or force applied by the opener to open and close the door. For a lightweight door, you need to reduce the force in order to prevent it from slamming shut or opening too forcefully. This will also help to minimize wear and tear on the door and the opener itself.
Step 1: Determine the Manufacturer’s Instructions
Before adjusting the force settings, it’s important to consult the manufacturer’s instructions for your specific garage door opener model. Different openers may have slightly different adjustment methods, so it’s best to follow the instructions provided. You can usually find these instructions in the owner’s manual or through the manufacturer’s website.
Step 1.1: Locate the Force Adjustment Controls
Once you have the manufacturer’s instructions in hand, the next step is to locate the force adjustment controls on your garage door opener. Typically, these controls are found on the back or side of the opener unit. They are usually labeled with “+” and “-” symbols to indicate the direction of adjustment.
Step 1.2: Understand the Force Adjustment Process
Take the time to familiarize yourself with the force adjustment process outlined in the manufacturer’s instructions. This will help you understand the specific steps involved and any safety precautions you need to take. Some garage door openers require the door to be disconnected from the opener before adjusting the force settings, while others allow adjustments with the door still attached.
Step 2: Test the Existing Force Settings
Before making any adjustments, it’s important to test the current force settings of your garage door opener. This will give you a baseline to work with and determine if any adjustments are necessary. Start by fully opening the door and then pressing the close button on your remote or wall control. As the door is closing, place a sturdy object, such as a 2×4 piece of wood, in the path of the door. If the door reverses upon hitting the object, the force settings are likely correctly adjusted. If the door continues to close without reversing, or if it reverses too forcefully, adjustments are needed.
Step 2.1: Adjust the Force Settings
Now that you have tested the existing force settings, you can proceed to make adjustments if necessary. Start by turning the force adjustment dial or control in small increments, either clockwise or counterclockwise as indicated in the manufacturer’s instructions. Test the door after each adjustment by fully opening it and then pressing the close button. Repeat this process until the door closes smoothly but without excessive force.
Step 2.2: Fine-Tuning the Force Settings
In some cases, you may need to fine-tune the force settings to achieve optimal performance. This can be done by making smaller adjustments to the force controls. The goal is to find the balance where the door closes smoothly without slamming shut or exerting too much force on the opener. Take your time and be patient during this process to achieve the best results.
Additional Tips for Adjusting Garage Door Opener Force Settings
Tip 1: Regularly Inspect and Lubricate the Door Mechanism
To ensure the smooth operation of your garage door and minimize the strain on the opener, it’s important to regularly inspect and lubricate the door mechanism. Check for any worn or damaged parts such as rollers, hinges, or springs. Lubricate the moving parts with a silicone-based lubricant to reduce friction and prevent premature wear.
Tip 2: Seek Professional Help if Needed
If you’re unsure about adjusting the force settings on your garage door opener or if you encounter any issues during the process, it’s always best to seek professional help. Garage door experts have the knowledge and experience to handle adjustments and repairs safely and effectively. They can ensure that your opener and door are properly adjusted to provide optimal performance and durability.
Tip 3: Regular Maintenance is Key
Adjusting the force settings is just one aspect of maintaining a garage door opener. Regular maintenance, such as cleaning the tracks, tightening loose hardware, and testing the safety features, is crucial for the longevity and optimal performance of your garage door system. Set a schedule for these maintenance tasks and stick to it to prevent any problems from arising.
In conclusion, adjusting the force settings on a garage door opener for a lightweight door is an essential task to ensure smooth and safe operation. By following the manufacturer’s instructions, testing the existing force settings, and making adjustments as needed, you can optimize the performance of your garage door opener and avoid any potential damage. Remember to regularly inspect and maintain your garage door system for long-lasting functionality.
Key Takeaways: How to Adjust the Force Settings on a Garage Door Opener for a Lightweight Door?
- Make sure the garage door opener is unplugged before making any adjustments.
- Locate the force adjustment screws on the opener unit.
- Use a screwdriver to turn the force adjustment screws clockwise to increase the force or counterclockwise to decrease the force.
- Test the door’s balance and function after each adjustment to ensure it is opening and closing properly.
- If the door still doesn’t operate correctly, consult the owner’s manual or contact a professional for further assistance.
Frequently Asked Questions
In this section, we will address some common questions related to adjusting the force settings on a garage door opener for a lightweight door.
Q1: Why is it important to adjust the force settings on a garage door opener?
Adjusting the force settings on a garage door opener is crucial for the safe and efficient operation of your garage door. When you adjust the force settings correctly, it ensures that the door will open and close smoothly, without unnecessary strain on the motor or other components. By setting the right force, you can prevent damage to the door and ensure its longevity.
Additionally, adjusting the force settings helps to prevent any accidents or injuries that may occur if the door is too heavy or too light. If the force is set too high, it can lead to a door closing with excessive force, posing a safety risk. On the other hand, if the force is set too low, the door may not close properly, leaving your garage and belongings vulnerable to theft or weather damage.
Q2: How can I determine if my garage door is lightweight?
To determine if your garage door is considered lightweight, you can follow a simple test. Start by manually opening the door halfway and then releasing it. If it stays in place or slowly closes, your garage door is likely lightweight. On the other hand, if it slams shut or falls quickly, it may be categorized as heavy.
Keep in mind that every garage door is different, so it is essential to consult your door’s manual or contact the manufacturer if you are unsure about its weight classification.
Q3: What tools will I need to adjust the force settings on my garage door opener for a lightweight door?
Adjusting the force settings on a garage door opener for a lightweight door typically requires the following tools:
– A ladder: This will help you access the garage door opener and adjust the settings comfortably.
– A screwdriver or hex wrench: Depending on your specific opener model, you will need a screwdriver or a hex wrench to make the adjustments. Refer to your garage door opener’s manual to determine the right tool.
– The owner’s manual: It is crucial to have the owner’s manual for your garage door opener, as it provides specific instructions for adjusting the force settings. If you don’t have the manual, you might be able to find it online by searching for the model number of your opener.
Q4: How do I adjust the force settings on my garage door opener for a lightweight door?
To adjust the force settings on your garage door opener for a lightweight door, follow these steps:
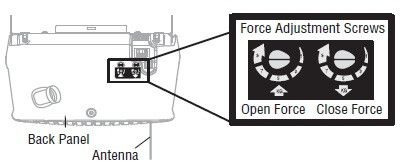
1. Locate the force adjustment screws on your garage door opener. These are usually found on the motor unit, near the back or sides.
2. Using a screwdriver or hex wrench, turn the force adjustment screws counterclockwise to decrease the force. Start with small adjustments and test the door’s movement after each change.
3. Test the door’s closing and opening. If the door doesn’t close properly or reverses immediately after touching the floor, increase the force slightly by turning the adjustment screws clockwise.
4. Repeat steps 2 and 3 until the door closes smoothly and reverses only when an obstacle is detected. Remember to make small adjustments to avoid setting the force too high.
Q5: Should I hire a professional to adjust the force settings on my garage door opener for a lightweight door?
While adjusting the force settings on a garage door opener can be done by homeowners, it is recommended to hire a professional if you are unsure or uncomfortable with the process. A professional technician has the knowledge and experience to adjust the force settings accurately, ensuring the door operates safely and efficiently.
Additionally, professional technicians can also inspect other components of your garage door opener and identify any potential issues that may require attention. This can prevent further problems down the line and save you time and money in the long run.

Summary
So, if you have a lightweight garage door and need to adjust the force settings on your opener, here’s what you need to do:
First, locate the force adjustment screws on your opener. These are usually labeled as “up force” and “down force.” Use a screwdriver to turn these screws clockwise to increase the force, or counterclockwise to decrease it.
Next, test the force by opening and closing the door. If it doesn’t open or close smoothly, adjust the screws until it does. Remember to make small adjustments and test the door each time until it’s just right.
By following these steps, you’ll be able to adjust the force settings on your garage door opener to perfectly match the weight of your lightweight door.